If you’re a Raspberry Pi tinkerer, surely you’ve seen the dozens of examples that light up an LED light. A Raspberry Pi (or RPi) is a very small and cheap computer originally designed for teaching computer science and programming. It includes a set of programmable input/output pins that allow you to connect electronic components to it.
Since it’s quite easy to control those pins with some code, it’s fun to play around with. However, it’s always up to you to give it some useful behavior.
Why not feed it with actual real-life data? In this post, we’ll use the Uptrends API to retrieve the status of your website monitors. Using the results of this query, we’ll light up a red LED if we found any errors, and a green LED if there were no errors.
Components needed for this set-up
- Hardware: an RPi, a breadboard (optional), jumper wires, one red LED, one green LED, two suitable resistors
- Software: Python 3 installed on your RPi, and an editor to edit a .py script
- Your Uptrends login credentials

Setting up the hardware components
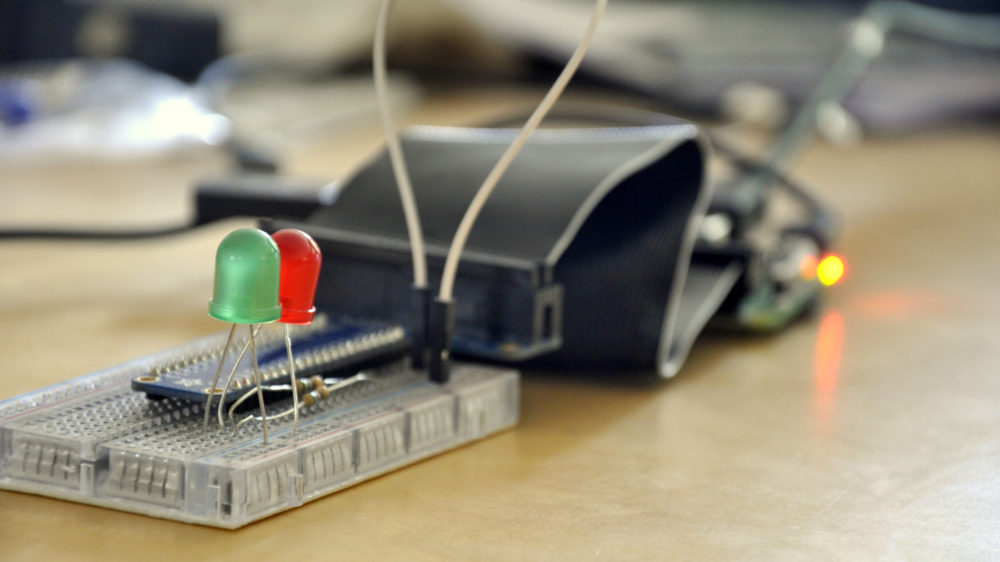
This blog post isn’t meant as an in-depth guide for setting up LEDs, but we’ll show our setup below. For a step-by-step beginner’s explanation on the Raspberry Pi’s GPIO pins, the hardware setup and programming the LEDs, please look at this guide.
In our setup, we’ve connected the T-Cobbler and breadboard from Adafruit to the RPi’s pin grid array. This is optional – it just simplifies connecting the electrical components – but you can hook them up to the RPi directly with a few more jumper wires. To connect the resistors and LEDs, we’ve used the exact same configuration as described on this tutorial page from Adafruit.
Notice how the red LED, through its corresponding resistor, is wired up to the pin marked #18. The green one is wired up to pin #23. We’ll need those pin numbers in the next section.
Code for lighting up the LEDs
Time now to start building our code. As described in the aforementioned tutorials, very little code is required to light up the LEDs. Let’s try one LED first:
import time
from gpiozero import LED
# Set up an LED object
_red_led = LED(18)
# Switch it on and wait 5 seconds
_red_led.on()
time.sleep(5)
# Switch the LED off again
_red_led.off()
Notice how we’re now referring to one of the pin numbers we used earlier in our hardware setup. Similarly, the green LED will be LED(23).
Code for accessing the Uptrends API
Now that we have the LEDs lighting up, let’s work on accessing the Uptrends API to retrieve some data we can respond to. The API documentation can be found at https://www.uptrends.com/api. We’ll be using Python’s requests module to execute the HTTPS requests necessary to access the API.
First, we’ll create a generic function that knows how to retrieve data from Uptrends if you tell it which API method to call:
def call_Uptrends_Api(method_url):
# Fill in your Uptrends credentials here
username = "my-email@my-domain.com"
password = "XXXXXXXX"
# Prepare data for the request
baseUrl = "https://api.uptrends.com/v3/"
authentication = (username, password)
headers = { "Accept": "application/json" }
# Execute the request
response = requests.get(baseUrl + method_url, auth=authentication, headers = headers)
# Convert the response into string data, which will contain JSON content
byteData = response.content
stringData = byteData.decode("utf-8")
return stringData
A few things to note about this code:
- The API requires that we use Basic Authentication as part of each HTTPS request. The requests module handles this for us if we supply the (username, password) tuple as the auth parameter.
- We’re suppling the Accept HTTP header to indicate we would like to receive a response in JSON format.
- The response returned by the requests.get method is an array of bytes. Our function returns it as a UTF-8 encoded string (which will hopefully contain JSON data).
We’ll now use this code to perform our first call to the API. Since we want to retrieve status information for all of our monitors, we want to call this method:
/probegroups/some-group-id/status
where some-group-id is the ID of the “All monitors”-group, so we get a complete list of all our monitors. So how do we figure out what that ID is?
Retrieving the “All monitors”-group
Let’s retrieve a list of our groups first. It will include the ID for each group. Since we only want to do this once, we can take a shortcut and simply load this URL in our browser:
https://api.uptrends.com/v3/probegroups?format=json.
You’ll be prompted for your login info.
[
 {
 "Guid": "656c1ffaebf04f389782128461ceabc7",
 "IsAll": true,
 "IsClientProbeGroup": false,
 "Name": "All monitors"
 },
 {
 "Guid": "741672ef78cf4b379512e6f8235ebd62",
 "IsAll": false,
 "IsClientProbeGroup": true,
 "Name": "Customers"
 },
 {
 "Guid": "6fbd929211784dee8e1849888d98c8bf",
 "IsAll": false,
 "IsClientProbeGroup": false,
 "Name": "Galactic Resorts Check Group"
 }
 ]
Calling this function gives us a JSON-list of monitor groups. The “All monitors”-group is in there too, and we can see that its ID is 656c1ffaebf04f389782128461ceabc7. Obviously yours will be different.
Retrieving status data for our monitors
We now have everything we need to retrieve status data for our monitors.
# Call the API to retrieve status data for every monitor in the All Monitors group
monitor_group_id = "656c1ffaebf04f389782128461ceabc7"
api_status_data = call_Uptrends_Api("probegroups/" + monitor_group_id + "/status")
The api_status_data variable now contains a Status object in JSON form for each of our monitors, but it would be convenient to have that in an array of objects so we can count how many have an error. Let’s define a small Status class, and a way to parse the JSON response into an array of Status objects.
class Status(object):
def __init__(self, errorLevel):
self.errorLevel = errorLevel
def statusInitializer(statusItem):
return Status(statusItem["ErrorLevel"])
# Use the json.loads function to convert each object in the JSON array into a Status object
statusList = json.loads(api_status_data, object_hook = statusInitializer)
The json.loads method takes the raw JSON string and uses the statusInitializer function to create individual Status objects.
Processing the result
The statusList variable now contains an array of Status objects. If we can count how many of them have an errorLevel of Confirmed Error, we know how to set our colored LEDs.
# Count the number of objects in the array of Status objects that have an error level of Confirmed Error
errorCount = sum(1 for status in statusList if status.errorLevel == "Confirmed")
Putting everything together
Using the errorCount from the previous step, we can now control the LEDs according to the number of errors, and output that number to the standard output for convenience.
def update_error_LED(error_count):
if error_count > 0:
_red_led.on()
_green_led.off()
else:
_green_led.on()
_red_led.off()
print("Monitors with errors: {:d}".format(error_count))
That’s pretty much it! If we wrap all of our method calls in a function get_status_update(), we can set up our script to get updates repeatedly:
while True:
get_status_update()
time.sleep(60)
It’s not useful to do this continuously, or even every second. We’re a good citizen if we avoid overloading the API, so using a delay of 60 seconds seems like a good value.
The full listing is available on our Github. If you want to use that code, remember to fill in your username and password, and the appropriate monitor group ID.
Testing
If everything worked according to plan, you now have a green LED lighting up… or a red one, which means that at least one monitor is having issues – go check that first! 😉
In case your setup is still showing green, we should test whether the red LED will light up too. A quick way to do this is by using a test monitor to generate an error in your account. Log into your Uptrends account, add a new HTTP(S) monitor, give it the URL of your favorite website, and a temporary name. Uncheck “Generate alerts” to avoid disturbing anyone with test alerts.
Let’s use the Page content match field on the Alert conditions tab to have this new monitor reporting an error. Enter “doesnotexist” or any other bogus text that is not present on the web page you specified. Save the monitor (tip: hold down the Control key while clicking Save to save your monitor and stay on the Edit page) and run your Python script. It should now light up the red LED as soon as an error is registered. Remove the offending Page content match value and hit Ctrl-Save to go back to green.
Achievement unlocked
Hopefully this post has been helpful for working with the Uptrends API using Python to control some hardware of the Raspberry Pi. Feel free to use other programming/scripting languages or command line tools to access the API as well. Powershell, anyone?
Happy building!


Leave a Reply