
If you’ve ever checked your page performance in our free Website Speed Test tool, you’ve seen a list of optimizations from Google Insights that when implemented improve your site’s performance leading to a better user experience and higher conversion rates.
The list of optimizations may seem overwhelming to some, but let’s take a look at the most common recommendations made by Google Insights and give you a little overview of what the recommendation is and how you and your users can benefit.
Start by benchmarking your page performance
You need to know how your page performs right now so that you can measure your success. If you are an Uptrends user (Business or Enterprise), you probably know exactly how your page is performing. If you are not an Uptrends user, you can use our free Website Speed Test Tool to test your site and gather the performance metrics you need to start optimizing.
We recommend you use one of our Mobile speed test options; what is fast on mobile is super-fast on desktop. Jot down your test parameters and checkpoint choice for future reference.

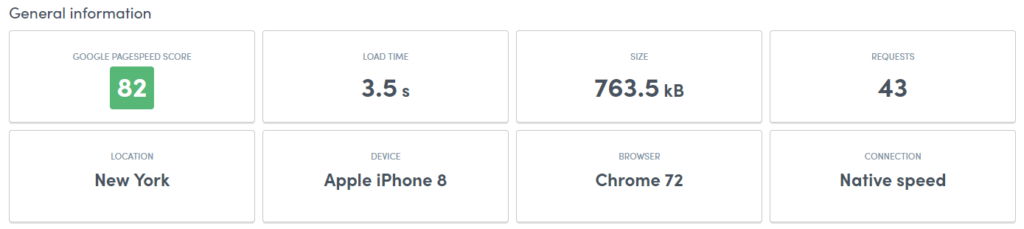
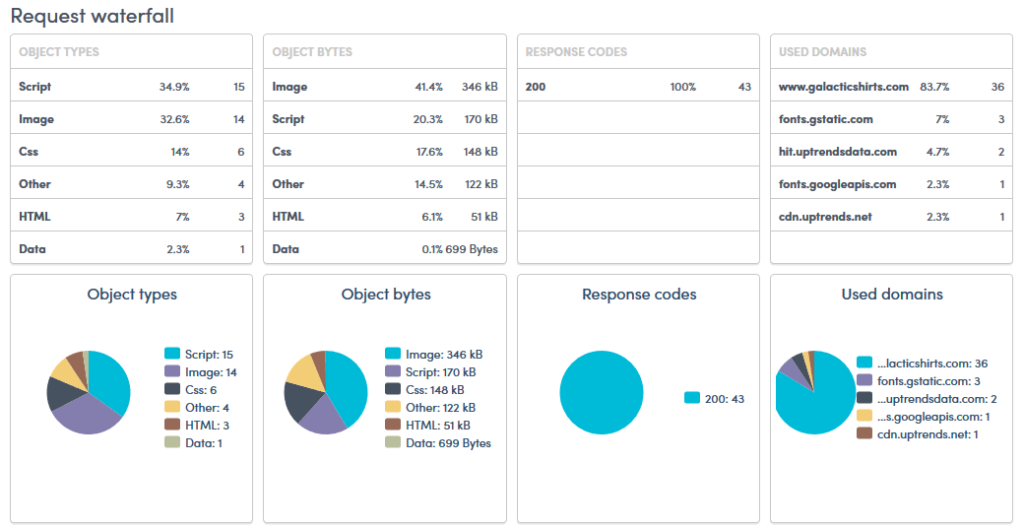
At the top of the free Website Speed Test tool results, you find data about your page size, object types, and object counts. Save this information along with the information about the connection and response times at the bottom of the waterfall chart.

Now that you know where you’re starting, you can start to apply the optimizations you need to speed up your page load times. At the top of the page, you’ll find a Google Insights score and a list of recommendations.
In this article, we will talk about these recommendations along with some other helpful optimizations you may need to make to improve your website’s performance.

Cut the crap: remove unnecessary downloads
Okay, “Cut the crap” isn’t an actual Google Insight recommendation because Google casts no judgment on the usefulness of your content (at least not at this point), but using an objective eye on your existing content is the first place to start.
Remove unused and unnecessary downloads
Some downloads never get used at all by the page requesting them. It is easy to forget to remove a file request from your page headers once your page no longer needs them. Forgotten page elements become a more serious problem when it comes to orphaned script files. Script files come at a price in performance not only from retrieval but in processing time. JavaScript takes 60% more processing time than images of the same size. Tree Shaking can help minimize bloat due to unnecessary code.
Other page elements may not offer much in return for their cost in page size and performance. Keep an eye out for page elements that receive little to no user interaction such as image carousels. Remove under-used elements to give your page a sudden boost in performance.
Crush it: Minify and compress your text-based resources
Did you know your HTML, CSS, and script files are full of unnecessary content that your users don’t see and, frankly, they don’t even need? After the developers finish site development, they leave a lot of stuff behind in the CSS, Script, and HTML files that the browser and the users don’t need. You can reduce file sizes by removing:
- Developer comments: Comments have an important role in making it easier to understand and read the code, but the typical users couldn’t care less about it and never sees nor needs the comments.
- Redundant code: Your CSS files may have multiple declarations for the same content, consolidating them reduces file size.
- White space and newline characters: White space and newline characters help people reading the code, but the browser doesn’t need them. The browser can read them just fine without the extra white space.

Common compression and minification tools can significantly reduce files sizes. Minification takes place before uploading the page to the web server while compression happens dynamically based on the user’s browser’s abilities.
Optimize images and graphics
A majority of a page’s content consists of image files. Common image files like JPEGs and PNGs already have compression performed on them, but it doesn’t mean that the files are optimal. Image optimization is a multi-faceted discussion.
Does the image offer value?
Don’t use images and graphics just for the sake of being pretty; if they don’t add to the story, it is best to leave them out.
Is the image sized appropriately?
Sending a high-resolution image to most devices wastes bandwidth. You need high-resolution when you plan on printing images, but for display on most screens, you only need 72 to 144 pixels per inch. Also, send images based on screen size instead of resizing images in the browser. If a page request comes from a smartphone, send images already sized to fit the screen.
Use the best format for your graphics
You have lots of choices for optimizing visual content:
JPEG: A compressed image format (lossy) used mainly for photographs. Due to loss of resolution when compressed, JPEG images are not suited for images containing text or other hard-edged graphic elements.
PNG: A compressed image format (lossless) used for photographs but better suited to graphics especially those that need to take advantage of transparency.
GIF: A compressed image format that uses at most 256 colors. Creates small graphics files, but it does not handle gradients well and offers no transparency. Animated GIFs are also popular on the web, but they carry a heavy cost to page performance due to file size. Converting GIF files into video can provide the same look without the high cost.
SVG: Scalable Vector Graphics that easily scale to the page. SVG files are used most often for icons and logos.
Image Sprites: A single image with several graphic elements that through the use of CSS you tell the browser which part of the image to display. Sprites are perfect for icons and other small page elements that would require multiple requests otherwise.
CSS and HTML: You can create many common graphics effects such as shadows and 3D animations directly on the page requiring no additional resources.
WebP: WebP is a lossless and lossy compression supported by Chrome and other Blink-based browsers that can reduce file sizes up to 25% more than PNG or JPEG formats.
Once you’ve figured out the best way to bring your images and graphics to the page, you need to make sure their file size is as small as you can get them. We use TinyPNG to minimize our JPEGs and PNG files to get the smallest file size and retain quality. Using tools like TinyPNG are great for static content, but if you need a more dynamic solution, check with your CDN providers. Most CDNs offer automated image optimization.
Use client hints to respond with the best resources
The request headers have optional information that describes the user’s environment and connection. Using values found in these headers, you can respond with the best content for the user’s circumstances.
The Accept request header tells the server the media file types it can process for things like images and audio. If the Accept header includes WebP, you can reduce the image payload by about 25%. The rest of the client hints are not automatic.
Using client hints
A server notifies the client that they would like to know certain things about the user’s environment by sending the Accept-CH header followed by the comma-separated list of variables. These variables are typically about screen and media resolution such as:
- Intrinsic size
- Density-corrected intrinsic size
- Extrinsic size
- Viewport width
- Device pixel ratio (DPR)
- Width
- Device Memory
Having the client information allows the server to format content for the best performance without wasting user bandwidth.
Network hints
Network hints tell the server about the connection. Using this collection of hints, the server knows the round-trip time (RTT) that tells how long it takes for the user to receive and process the content. Other hints include:
Downlink: megabits per second for download speed
Effective connection type (ECT): This is a comparative type and not the actual type. If your downlink time looks to be more like a 3g connection instead of a 4g speed, the server treats it as such.
Save-Data: Indication that the client would like to receive less data.
Using client hints can have a big payoff, but using them gets complicated quickly. Jeremy Wagner covers the basics along with use cases to help you along.
Get it once and done with HTTP caching
Many page resources get used over and over again as a user clicks through your site. Retrieving these files again has a serious impact on your users’ experiences on your site. Http caching helps minimize the number of round trips required to load the subsequent page. By setting the cache-control’s maximum age and providing an etag or token, you let the browser reuse the resource from the cache if it hasn’t expired, and if it has expired, the browser can send back the token to find out if the resource has changed. If nothing has changed, the browser can reuse the resource from its cache. Set your max-age as long as possible for page resources that change infrequently.
Prioritize and Reduce the number of Requests
You need to load your above-the-fold content or critical-path content first. Your priority for any page is to satisfy the user by giving them the content they request ASAP. If you’re attempting to load everything at once, your users sit and wait, and many of them bounce (40% bounce within the first three seconds of wait time).
- Bundle CSS and script files: Packing your files into a single download may make for faster load times by reducing the number of requests. Be careful not to block rendering by sending critical files first.
- Decide what is critical and use code splitting to send what is important right away and bundle and lazy load the rest.
- Use media types and media queries to mark noncritical CSS as non-render blocking.
- Use HTTP/2 push to send critical files with the HTML.
- Enable HTML caching to prevent multiple requests for the same file.
- Use preloading and preconnect browser hints to side-step browser prioritization and retrieve files you know the page needs in advance.
Eliminate render-blocking JavaScript and CSS in the above-the-fold content
How long your users stare at a blank screen waiting for your page loads is impacted by lots of factors, but you can get them interacting faster and keep them from bouncing by giving them something right up front.
The browser needs to process the HTML, JavaScript, and CSS files before it can construct the CSSOM and DOM. Until the browser downloads and processes all those files the user sees nothing. To help shorten the users actual and perceived wait times, send only the critical JavaScript and CSS. Send the off-screen code and user interaction conditional code asynchronously to get the screen rendered faster. By the time the user scrolls or interacts with the content, the browser will have downloaded and processed the code. Read more about render-blocking code from Ilya Grigorik.
In the end, is it worth the added work? Absolutely!
Even the smallest gains in website and page performance can have a huge impact on user satisfaction, conversion rates, retention, page rankings, and revenue.
- 40% of users leave a site that takes more than 3 seconds to load
- Each second costs 7% in conversions
- A one-second page speed delay for a site making $100 thousand a day could result in losses of $25 million per year (source).
Your revenue is tightly coupled with your website, web application, and API performance. Every few microseconds you trim off your load times can let you enjoy major rewards with higher conversions and repeat visitors.
Web performance can drop unexpectedly
Your website is a living breathing animal that requires daily care and feeding. Every code change, content change, network change, and architecture change has the potential to influence your website’s performance. Frequently the influence is not a positive one, and it could go unnoticed for quite some time. Protect your investment and automate your performance testing with Uptrends Full Page Check, Multi-step API, or Web Application monitoring. Uptrends will let you know the moment your performance drops under your performance tolerance threshold.


Leave a Reply